
Loading the latest stories…




Color gamps are useful tools in weaving, but they take time, lots of yarn, and can’t be rearranged. Instead, try Jennifer E. Kwong’s genius weave-less gamps to help you choose colors before weaving.
Jennifer E. Kwong5 min read
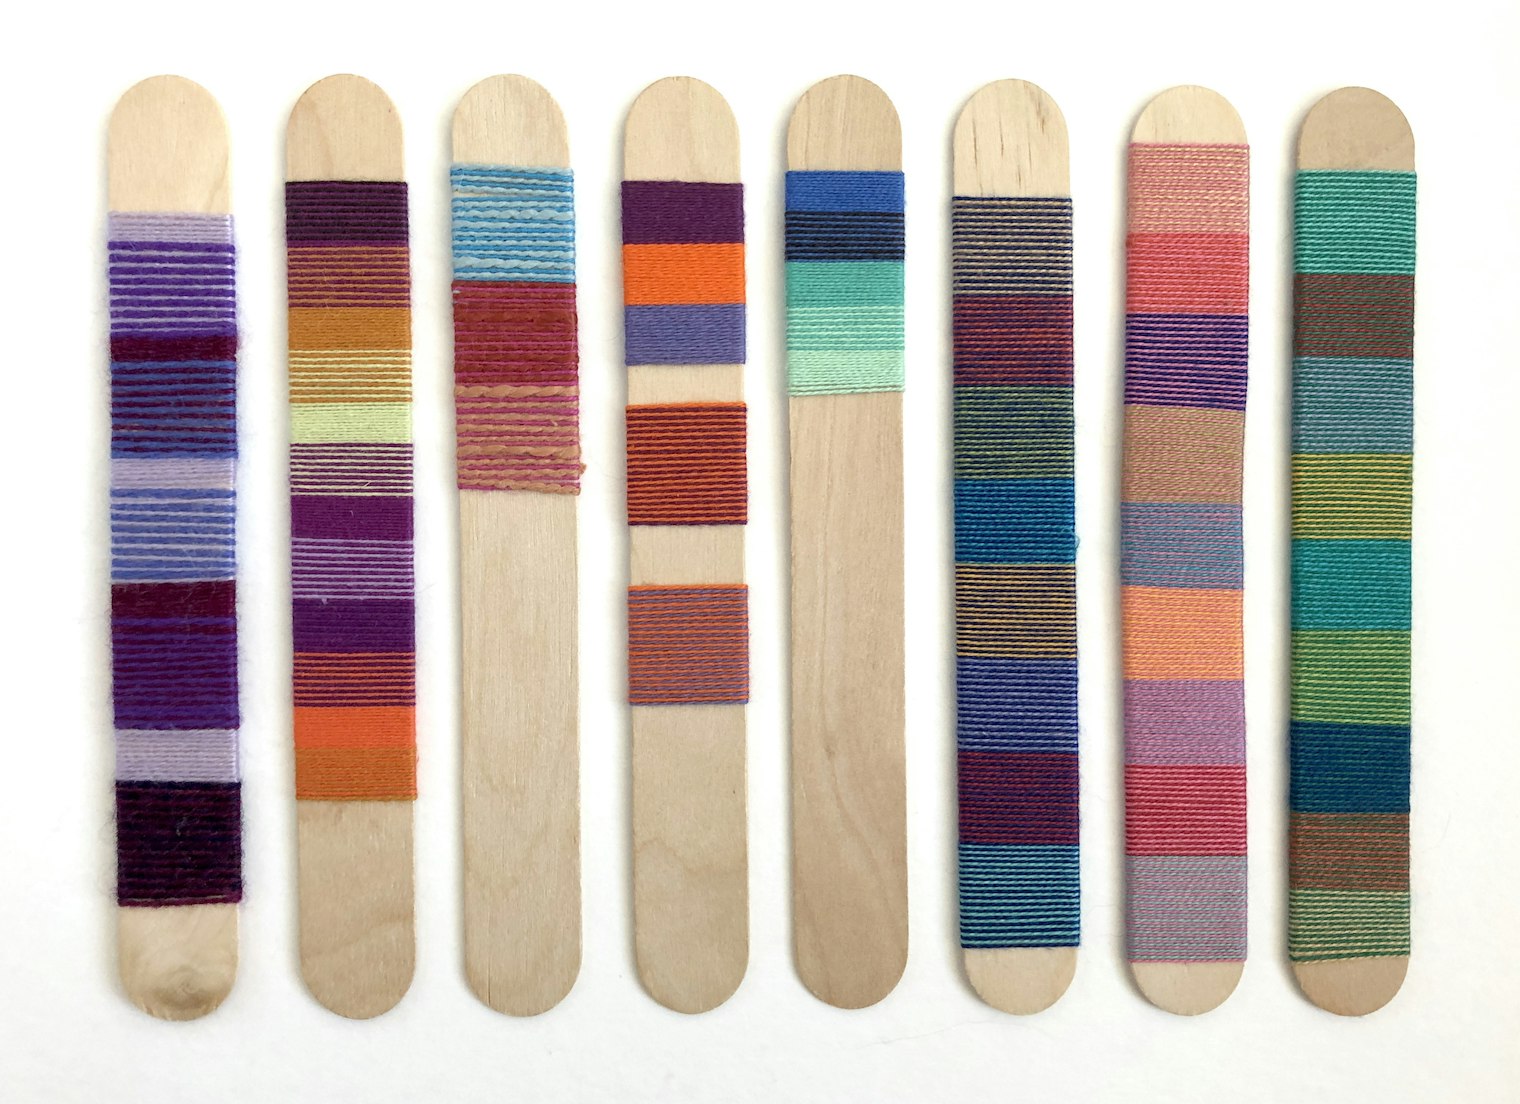
While weaving usually brings great joy and satisfaction, the feeling can quickly turn into disappointment when the cloth doesn’t turn out quite right.
Thinking back to my early weaving days, my dissatisfaction with a piece often stemmed from my color choices. Back then, I would choose warp and weft colors that looked great when placed side by side in their ball or cone form. Once woven together, unfortunately, some of the combinations turned out to be underwhelming, muddy, or just downright ugly.
What is it about weaving that can make two perfectly fine colors turn to mud when combined? It’s due to a phenomenon called optical color mixing where the brain combines the tiny dots of visible warp and weft to create a new, perceived color. It can be difficult to guess how colors will mix once they’re woven together, which is why weaving a color gamp is an often-suggested exercise for exploring optical color mixing.
Color gamps are a bit like a multiplication table, but with colors instead of numbers. Each color is assigned a section of the warp, usually in equal widths. The same color pattern in the warp is then repeated in the weft. The resulting cloth (the multiplication table) is a matrix of all the combinations of warp and weft.
While gamps are an invaluable tool, they have some disadvantages: they take time to weave, it can be costly to purchase multiple yarns, and gamps are static. By “static,” I mean that while a gamp will show you how one warp color interacts with a weft color, it is not possible to rearrange the weft order to try something new. Although I’ve woven many colorful plaids, for these reasons I’ve never woven a gamp; instead, I developed my own method for studying color interactions.
What if you could visualize warp-and-weft combinations quickly—without weaving? I’m happy to say that there is a simple way to do just that—one that saves both time and money while still giving you an accurate sense of how your colored yarns will interact. The idea is to produce optical blending, but instead of creating tiny squares of color, we will create thin stripes of color. When they are viewed from a distance, you will see the optical blending at work.
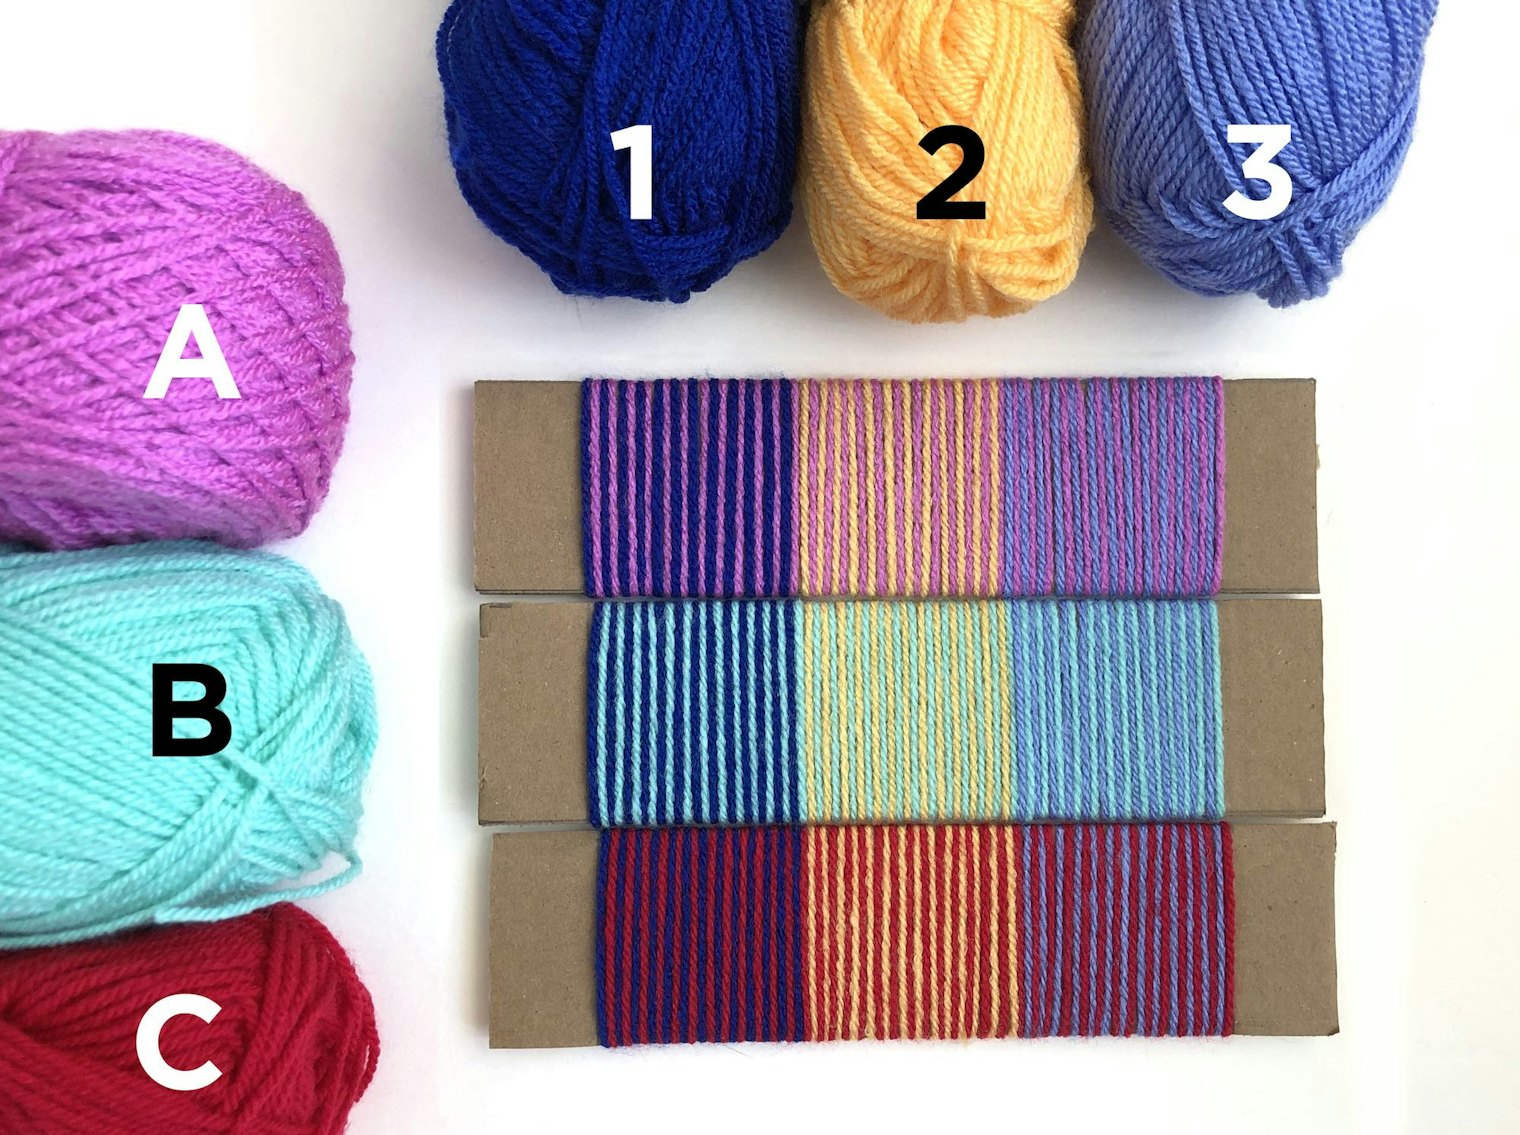
Just as with a woven gamp, a weave-less gamp creates a grid with different color combinations in each square. Unlike a woven gamp, the rows can be rearranged or unwound and rewound with different color combinations.
To make your own weave-less gamp you’ll need the following supplies:
Step 1: Plan your gamp. Decide the number of warp and weft colors for your gamp. For this example, we’ll use three warp colors and three different weft colors to create a 3 × 3 gamp.
Step 2: Determine the size of your gamp’s squares. Wrap a single strand of yarn around a ruler 24 times using moderate tension. The yarn should be taut, but not stretched out, with each wrap lying snugly beside the previous one. Note the width of the 24 wraps. With my DK acrylic yarn, the measurement was about 2".
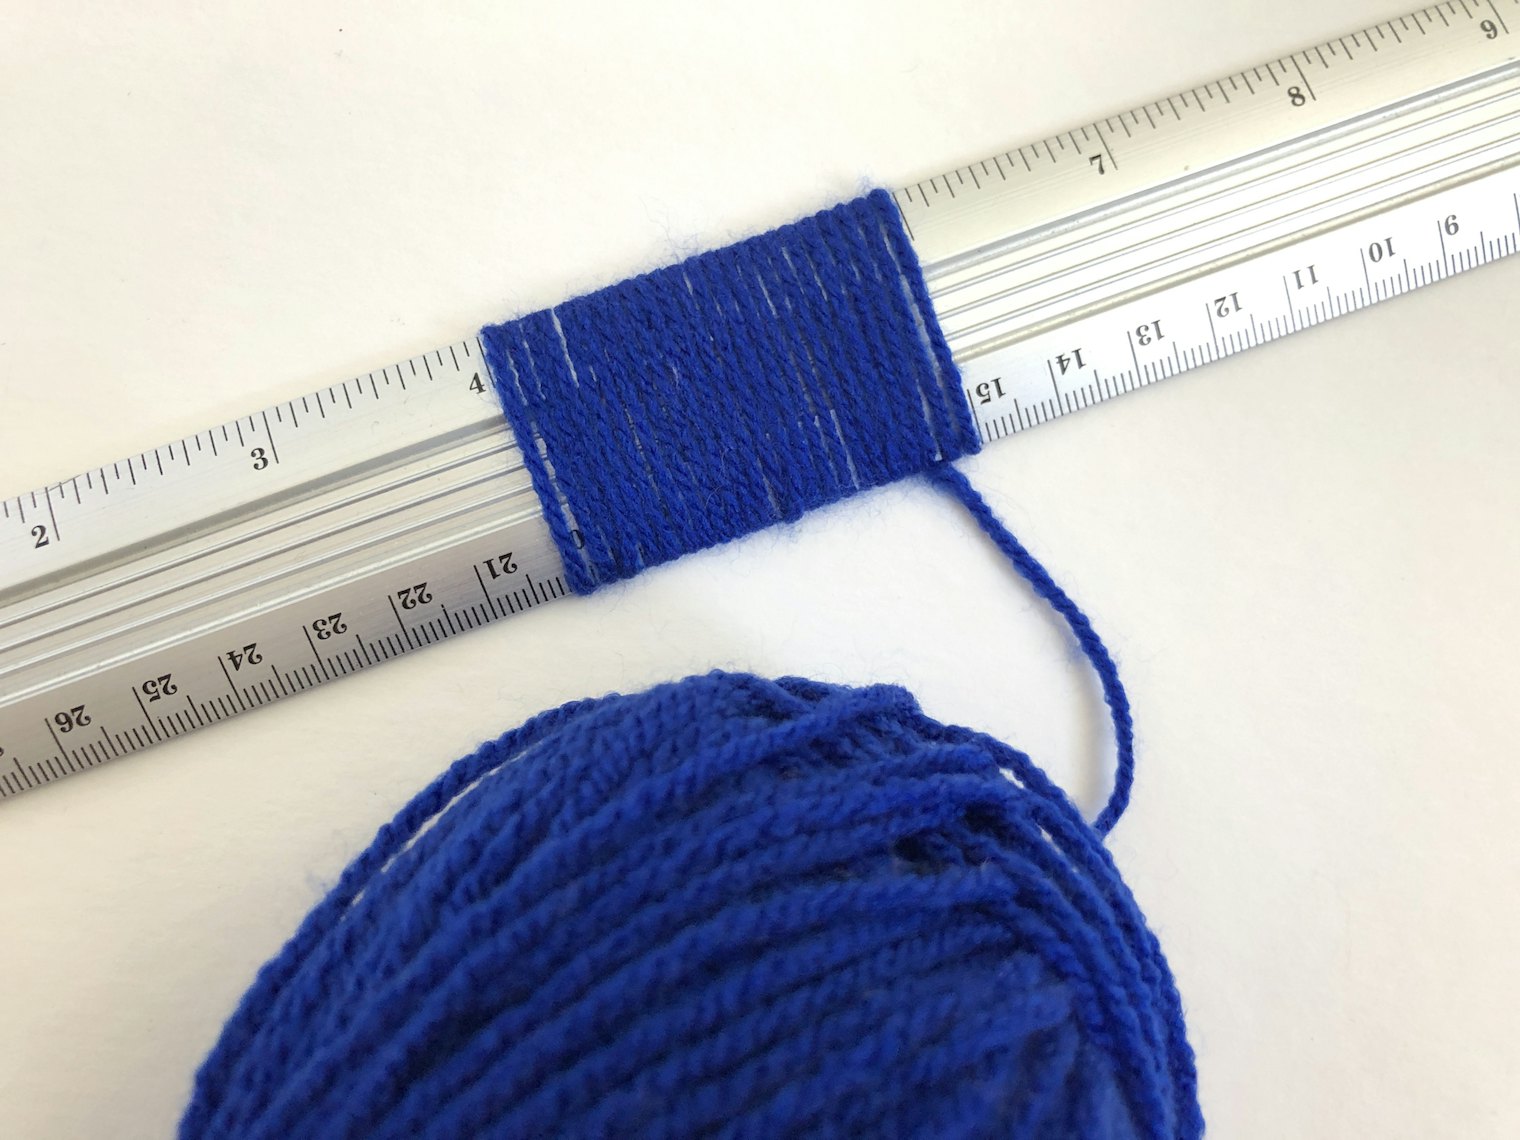
When wrapping your yarn for Step 2, don’t pull the yarn too tight or leave it hanging loose. Pull it just enough so it stays straight with minimal stretching.
Step 3: Prepare the cardboard. Calculate the total height and width using the following formulae:
In this example, the cardboard height is 6" (3 x 2) and the width is 8" (3 x 2 + 2). Leaving a 1" border on both sides of the cardboard, measure and mark the rows and columns. Cut along the horizontal lines using a utility knife and self-healing mat or scissors to separate the cardboard into 3 rows.
Step 4: Assign labels. Designate letters (A, B, C) for the warp colors and numbers (1, 2, 3) for the weft colors.
Step 5: Wrap the yarn. Using the column lines as guides, wrap the yarns two at a time to create each combination. Keep the yarns flat with no twisting and secure the ends with tape. In this example, I wrapped my first card with the following color combinations: A1, A2, and A3. For the second card I used B1, B2, and B3 and for the third I used C1, C2, and C3.
Step 6: View your gamp. Arrange the cards so that A, B, and C appear as vertical columns. View them from a distance or take a photograph and slightly blur it, as seen in the photo below, to see how the colors interact. Change the order of the cards to visualize a gamp with different weft order.
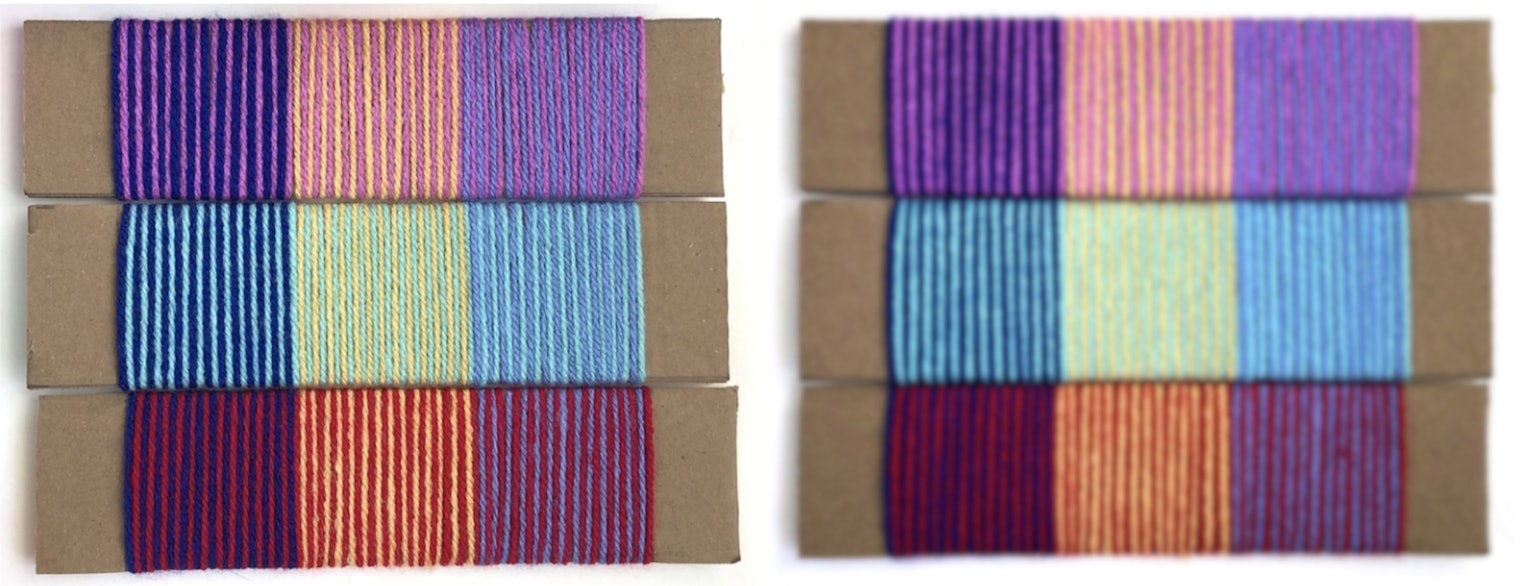
Taking photos of your weave-less gamps and blurring them is one way to see how optimal color mixing affects each color combination. You can save these photos alongside the unblurred versions as references for future projects.
If you want to make your own weave-less gamps, but don't have enough yarns of the same width, don’t worry! A set of more than 100 embroidery floss colors can be purchased online for less than $20. Choose a set that contains a wide range of hues (red, orange, yellow etc.), saturations (strength of hue, e.g., lavender vs. royal purple) and values (light vs. dark). Make your weave-less gamps using the embroidery floss, then you can confidently buy yarn in colors that will work well together.
Think of a weave-less gamp as your color playground. Experiment, shuffle, and surprise yourself with unexpected combinations. You might just discover a new favorite color combination!
Jennifer loves using color in creative ways, and you can see how her weave-less gamp technique has resulted in stunning color combinations in several of her projects, including her Sheer Delight Scarf and Walk This Way Bath Mat.
More from Little Looms
 From WIF to Woven ClothLearn how to use WIFs and weaving software to create and edit patterns—before you put a single thread on the loom. Christina Garton · July 23, 2026
 Designing Borders for Pick-Up BandsLearn tips and tricks for designing borders for your pick-up bands, from simple stripes to more complex color-and-weave designs. Christina Garton · July 2, 2026
 A Trio of Table ToppersGo beyond rectangular runners with table toppers. Christina Garton · June 30, 2026
 Roll the Dice on Your Next DesignFind out how easy it is to kick-start your creativity when you leave your design choices up to chance. Tommye McClure Scanlin · June 9, 2026
 Dealing with Selvedges that Go BumpLace weaves are notorious for creating uneven, scalloped, and overall lumpy-bumpy selvedges. Learn two different methods for handling these selvedges in the first installment of our Summer Selvedge Series. Christina Garton · June 4, 2026
 Why Colors Mix Differently on the LoomHow the colors of your warp and weft interact often has nothing to do with the colors themselves. Find out how sett, luster, and weave structure all affect the final cloth. Sara C. Bixler · May 26, 2026
 Up Your Design Game with the Fibonacci SequenceLearn how easy it is to design beautiful, asymmetric patterns using a simple bit of math. Christine Jablonski · April 21, 2026
 Choosing Yarns for the Pin LoomBenjamin Krudwig · March 17, 2026
 Weave Tiny Masterpieces Anywhere with Sketch TapestriesFind out how tapestry weaver Rebecca Mezoff captures moments in small-form weavings she calls sketch tapestries. Learn her design technique as well as what she keeps in her to-go kit for weaving anytime, anywhere.Rebecca Mezoff · February 17, 2026
 Weave Brilliant Inkle Bands with GradientsLearn how designer Julie Beers uses colorful cotton yarns to weave bands with colors that blend together beautifully. Julie Beers · August 28, 2025
From the Library


Comments
No comments yet — be the first to share your thoughts.
Sign in to join the conversation — commenting is for signed-in members.