
Loading the latest stories…

Want to learn how to warp and weave on your rigid-heddle loom more efficiently? Learn the tips and tricks Elisabeth Hill used when designing and weaving her Team Colors scarves.
Elisabeth Hill6 min read

I’ve heard weavers say that if you learn one good tip at a workshop, it was worth the price of admission. Well, here are many good tips and tricks from <a href="https://handwovenmagazine.com/team-colors-weave-along/" rel="noopener" target="blank">Elisabeth Hill about starting to weave on a rigid-heddle loom, a few of which I intend to put into my own arsenal! Download one or more of the free Team Colors scarf patterns, and then check out what Elisabeth has to say to help you get your own Team Colors scarf on the loom.
As we all know, “you have to be warped to weave”—and getting a warp on the loom can seem like a high hurdle for many new weavers. The good news about rigid-heddle weaving is that warping the loom can really be a pain-free process. Here are a few tips, tricks, and tools that work for me and may help you get off the bench and onto the field, er, loom!

Lisa used even numbers in her warp stripes to make direct warping easier. (Jagger Spun Team Colors Home Scarf) Photo by George Boe
Direct warping is the simplest way to get weaving on a rigid-heddle loom, and even numbers make direct-warping even simpler. I designed the Team Colors scarves to make direct warping easy with stripes that are made up of even numbers of ends.
All four Team Colors scarves start with a 108" (3-yard) warp. This length results in scarves that are approximately 72" long. For other scarves, decide on a finished length that suits you and adjust the warp length accordingly. To get an idea of how long I want a finished scarf to be, I use a 108" tape measure, wrap it loosely around my neck and hang it down to where I want the ends of my scarf to be. This gives me my desired finished length, and I can determine—by adding loom waste, take-up, and shrinkage—what my warp length should be.
I happen to have a dining-room table that works great for a 3-yard warp and makes the process simple. However, the process can be adapted in many creative ways depending on when and where you are warping. I have warped my rigid-heddle loom in state parks and motel parking lots and off the tailgate of my old Toyota. I highly recommend Liz Gipson’s “Slots and Holes” video for offering warping options that may work for your needs.

The Irwin Quick-Grip clamp will fit most furniture and is easy to use. Photo by Susan E. Horton
You have the loom, but there are some other things you can do that will make direct warping easier.
Paper works well, and some looms come with cardboard strips, but my favorite warp separator is a set of bamboo placemats. They are 12¾" wide, and a set of six works perfectly for most scarf lengths.
I hold the loop from the warping peg in my hand and cut it as evenly as possible. I then gently flip the “top of the loop” over the heddle and secure the bottom of the loop in a few bouts. Then, deploying the “threading side” of my sley hook, I thread the holes using the top threads. This ensures that when I thread the holes, I minimize any twisting of the slot and hole threads.
You need to think about how you would like to finish your scarf before you start to weave. Whatever decisions you make necessitate slight tweaks to your starting point.
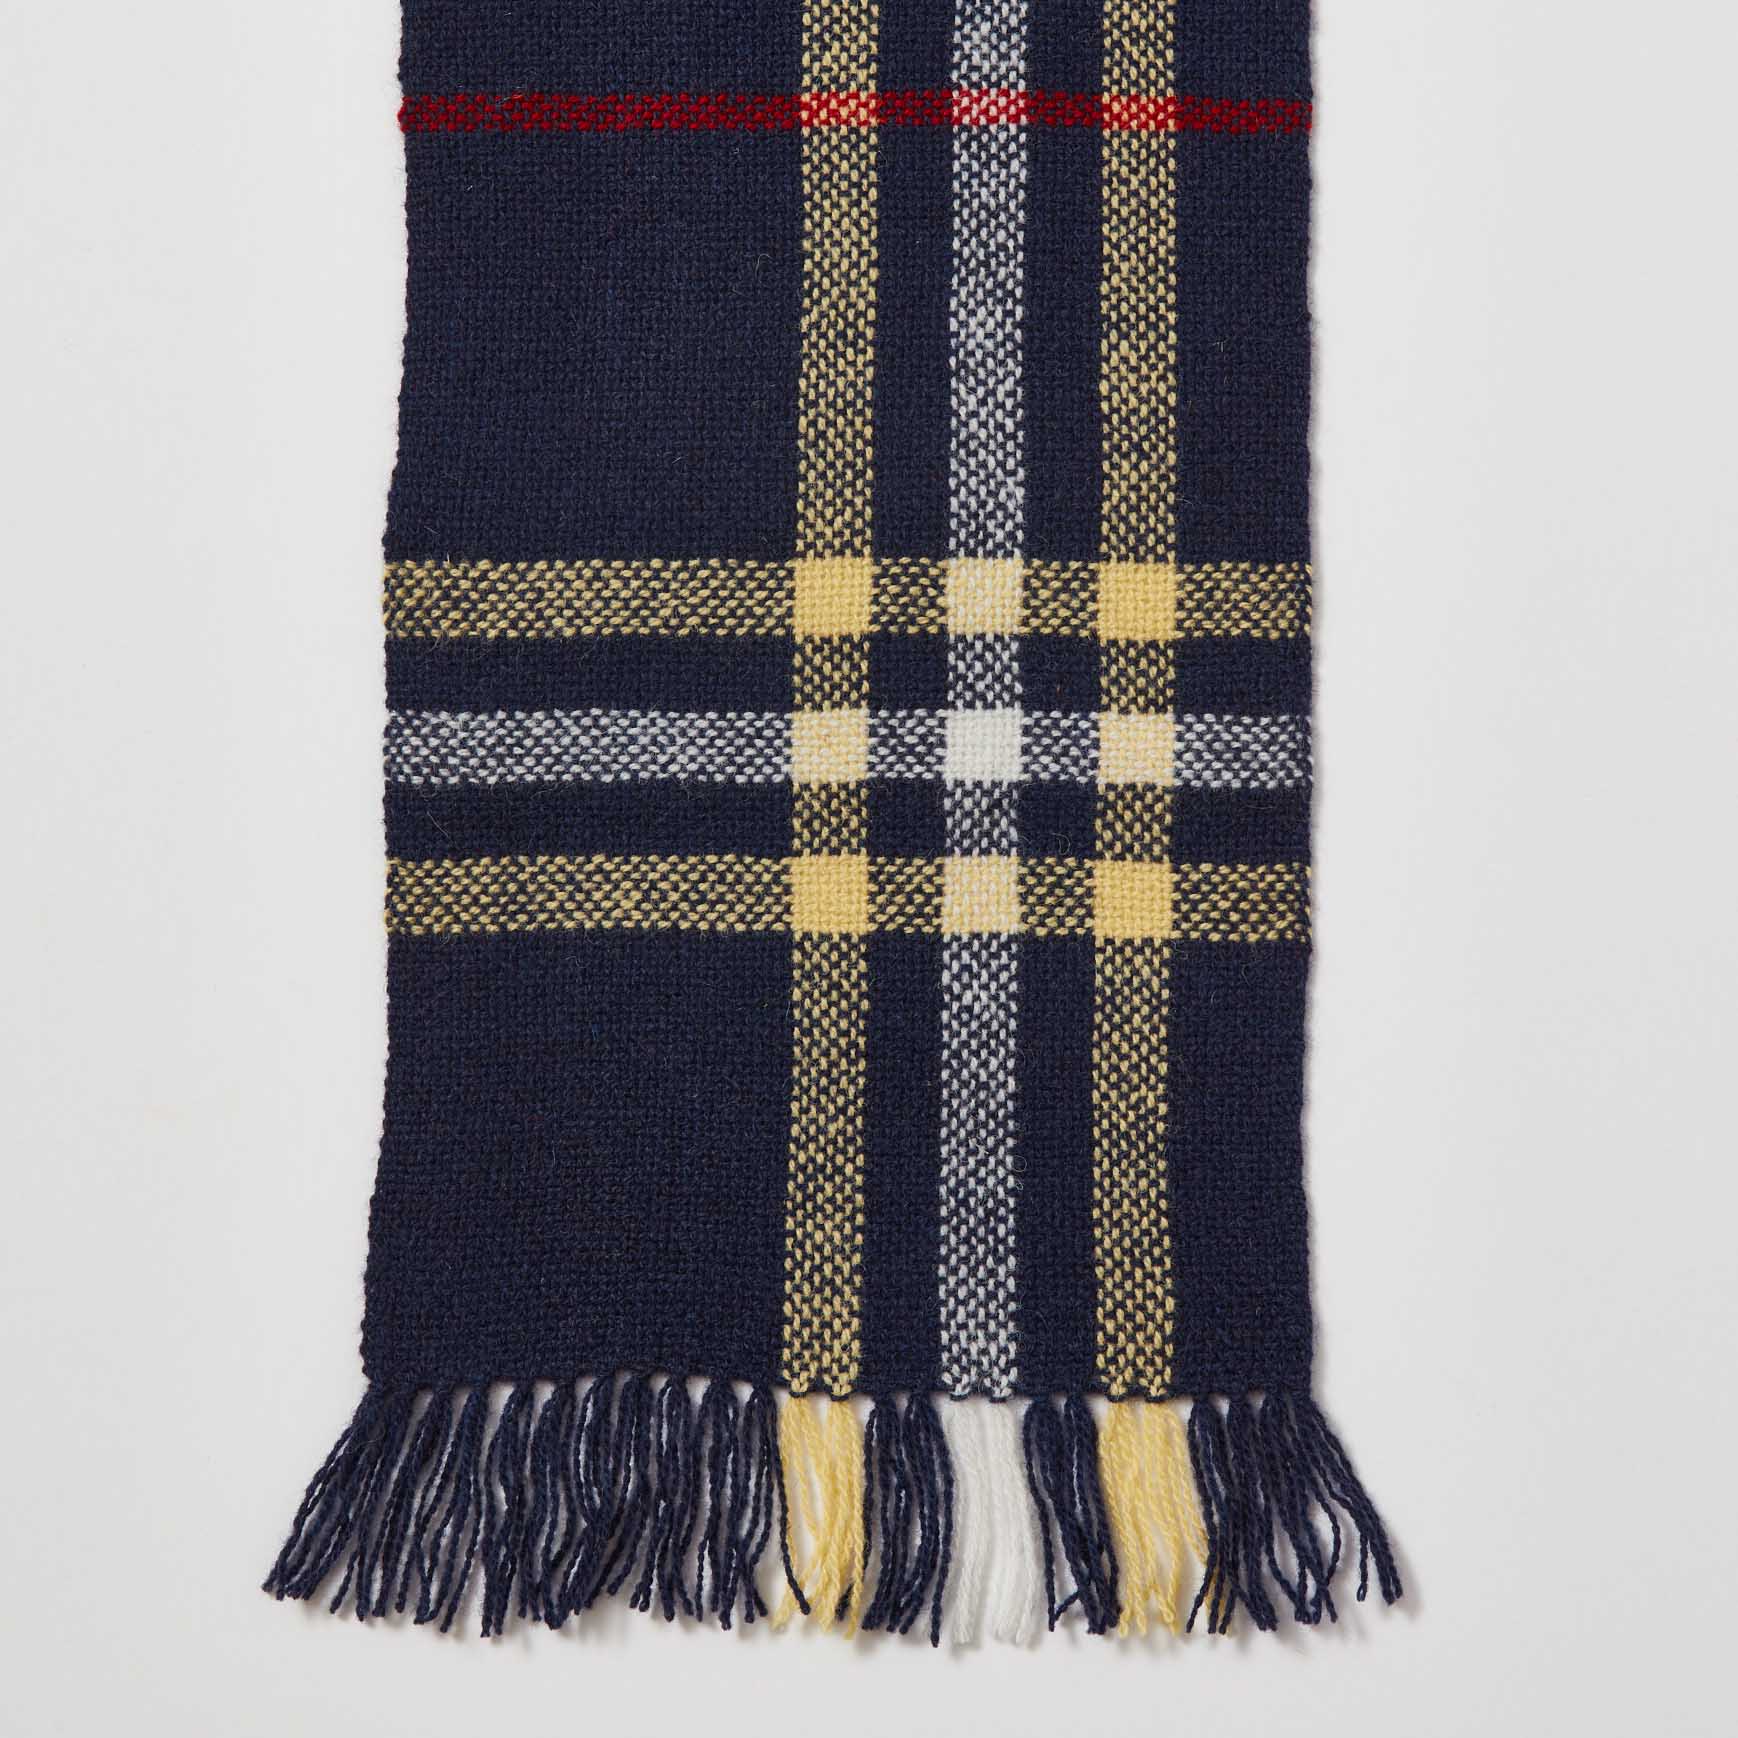
A hemstitched fringe on the Halcyon Yarn Team Colors Home Scarf works well with Halcyon Yarn's Victorian 2-ply wool. Photo by George Boe
Use a pattern template on grosgrain ribbon or twill tape to keep track of your pattern and help you maintain the correct picks per inch (ppi). This prevents running out of warp or weft mid-motif and helps you develop a consistent beat. All four of the Team Colors scarves have directions for doing this, including measurements.
Both stick and boat shuttles work for these scarves. When I work with any yarn heavier than fingering weight, my preference is a stick shuttle a little longer than my warp is wide. Stick shuttles hold a lot of yarn, are relatively inexpensive and I find them easier to manage when I am using multiple shuttles.
Let’s say you want a 6" twisted fringe with hemstitching. Estimate how much warp you’ve used for tying on, then bring your warp forward if needed to allow for 8" of unwoven warp. Open a shed and, using scrap yarn, throw the first pick but don’t beat. Change sheds, throw, change sheds, throw, and then beat. This will spread the warp. Leave a small gap and throw the first pick of scarf weft leaving a tail 4x the width of your warp. Throw 3 more picks and hemstitch using the weft tail. Measure, noting that you may need to throw a couple extra picks before your first color change because the hemstitching compresses the beginning picks. Attach your template and start weaving, using the weft color orders in the Team Colors scarves downloads. Game on!
Seriously, I never thought about separating my warp threads at the loop to keep them from twisting and tangling. I’m starting a Team Colors scarf for my husband, using the colors of the Jagger Spun Team Colors Away Scarf and the pattern of the Jagger Spun Team Colors Home Scarf. I’m using that tip, and I’ll keep you posted on how it works.
Weave well,
Susan
*Originally published 6/30/2022; updated 6/3/2025
More from Little Looms
 Skill Guide: A Weaver’s Guide to FiberNo matter what loom(s) you love to weave on, understanding the different characteristics of a fiber can help you make better choices when picking yarns for projects.Christina Garton · July 31, 2026
 From WIF to Woven ClothLearn how to use WIFs and weaving software to create and edit patterns—before you put a single thread on the loom. Christina Garton · July 23, 2026
 Give Yourself the Gift of a Weaving GetawayWhat’s better than learning to master a new weaving? Doing it among friends, new and old! Little Looms Editors · July 21, 2026
 6 Easy Ways to Elevate Your Selvedges with TrimsAdd extra flair to your selvedges and hems with these terrific trims. Christina Garton · July 16, 2026
 Twill for the Rigid-Heddle Loom: It’s Easier Than You Think!Learn why weavers love twill—and what makes it a great weave for the rigid-heddle loom.Christina Garton · July 14, 2026
 A Celebration of Stripes: Call for Submissions Fall 2027We're looking for striped projects of all kinds for our Fall 2027 issue—and that includes plaids and checks, too!Christina Garton · July 9, 2026
 Make Your Own Cardboard Mini-ShuttlesButterflies are beautiful, but they’re not always the best choice when you’re weaving. Try winding small bits of weft on these simple, DIY cardboard shuttles instead!Christina Garton · July 7, 2026
 A Trio of Table ToppersGo beyond rectangular runners with table toppers. Christina Garton · June 30, 2026
 Crochet for Your Selvedges? Your Edges Will Thank YouFind out why Sara Bixler finishes some of her woven pieces with crochet. Watch her free video clip, and then dive into several stitch options to try on your next project. Little Looms Editors · June 25, 2026
 Compose a Masterpiece on Your LoomAfter all, a loom is just another type of stringed instrument. Christina Garton · June 23, 2026
From the Library




Comments
No comments yet — be the first to share your thoughts.
Sign in to join the conversation — commenting is for signed-in members.