
Loading the latest stories…

Learn what the different parts of a rigid-heddle loom are called, where they are located on the loom, and how they’re used during the weaving process.
Christina Garton5 min read
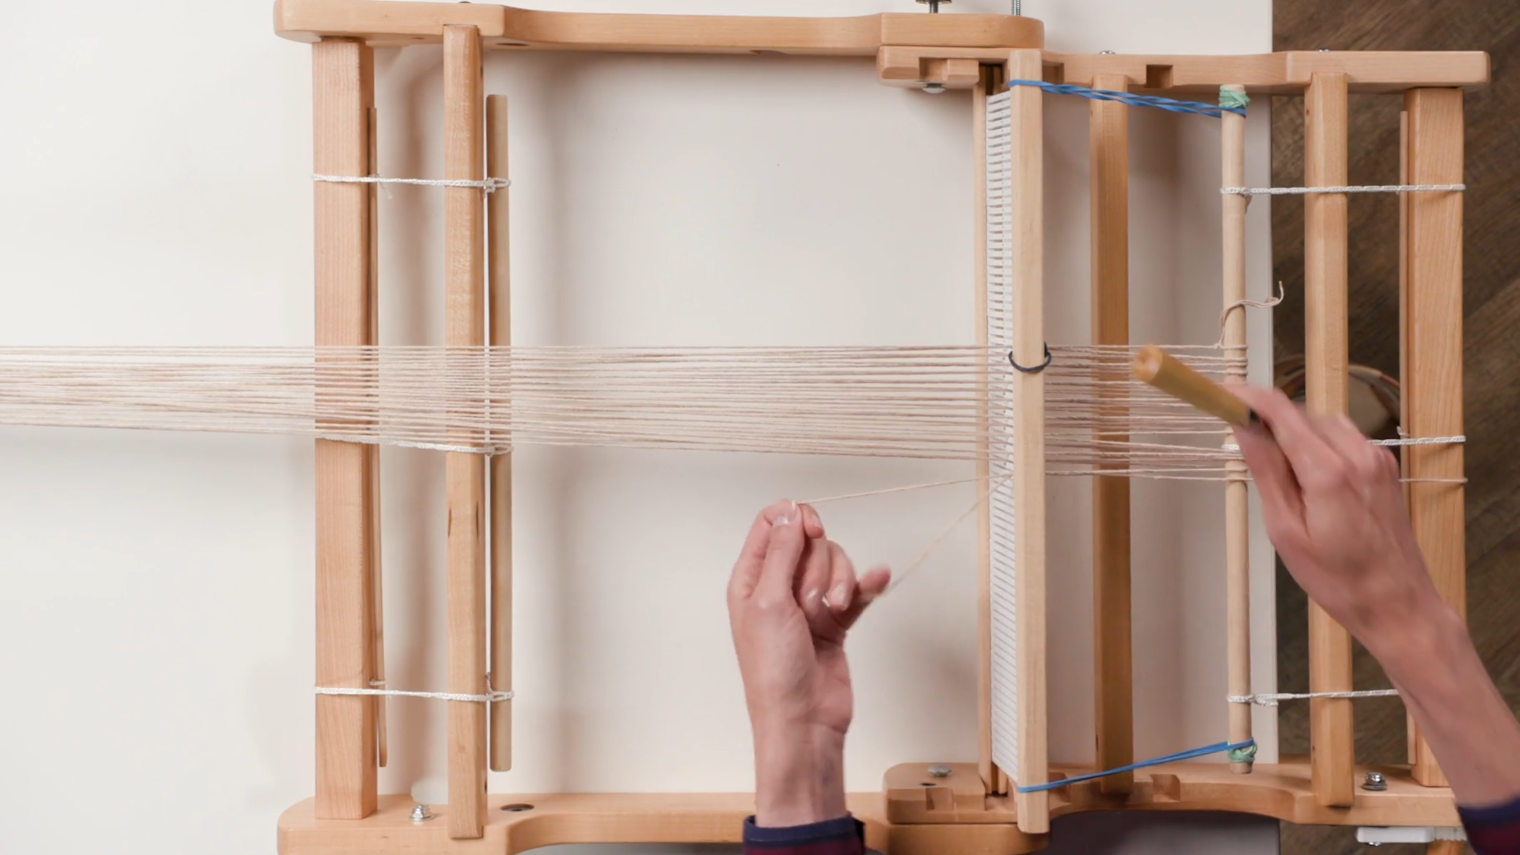
So, you’ve got a rigid-heddle loom. Now what? Before you can get your loom warped and start to weave, it’s important to know the different parts of your loom and how they’re used. To make learning about your loom easier than ever, we’ve made this handy guide where you’ll find:
While the appearance and location of each loom part might vary slightly depending on your loom’s make and model, each part should be in roughly the same location. Also, regardless of how they might look, the basic loom parts and their purposes remain the same from loom to loom. Some looms might have extra parts or equipment, such as warping aids or extra heddle blocks. When in doubt, refer to manufacturer's paperwork for your specific loom model.
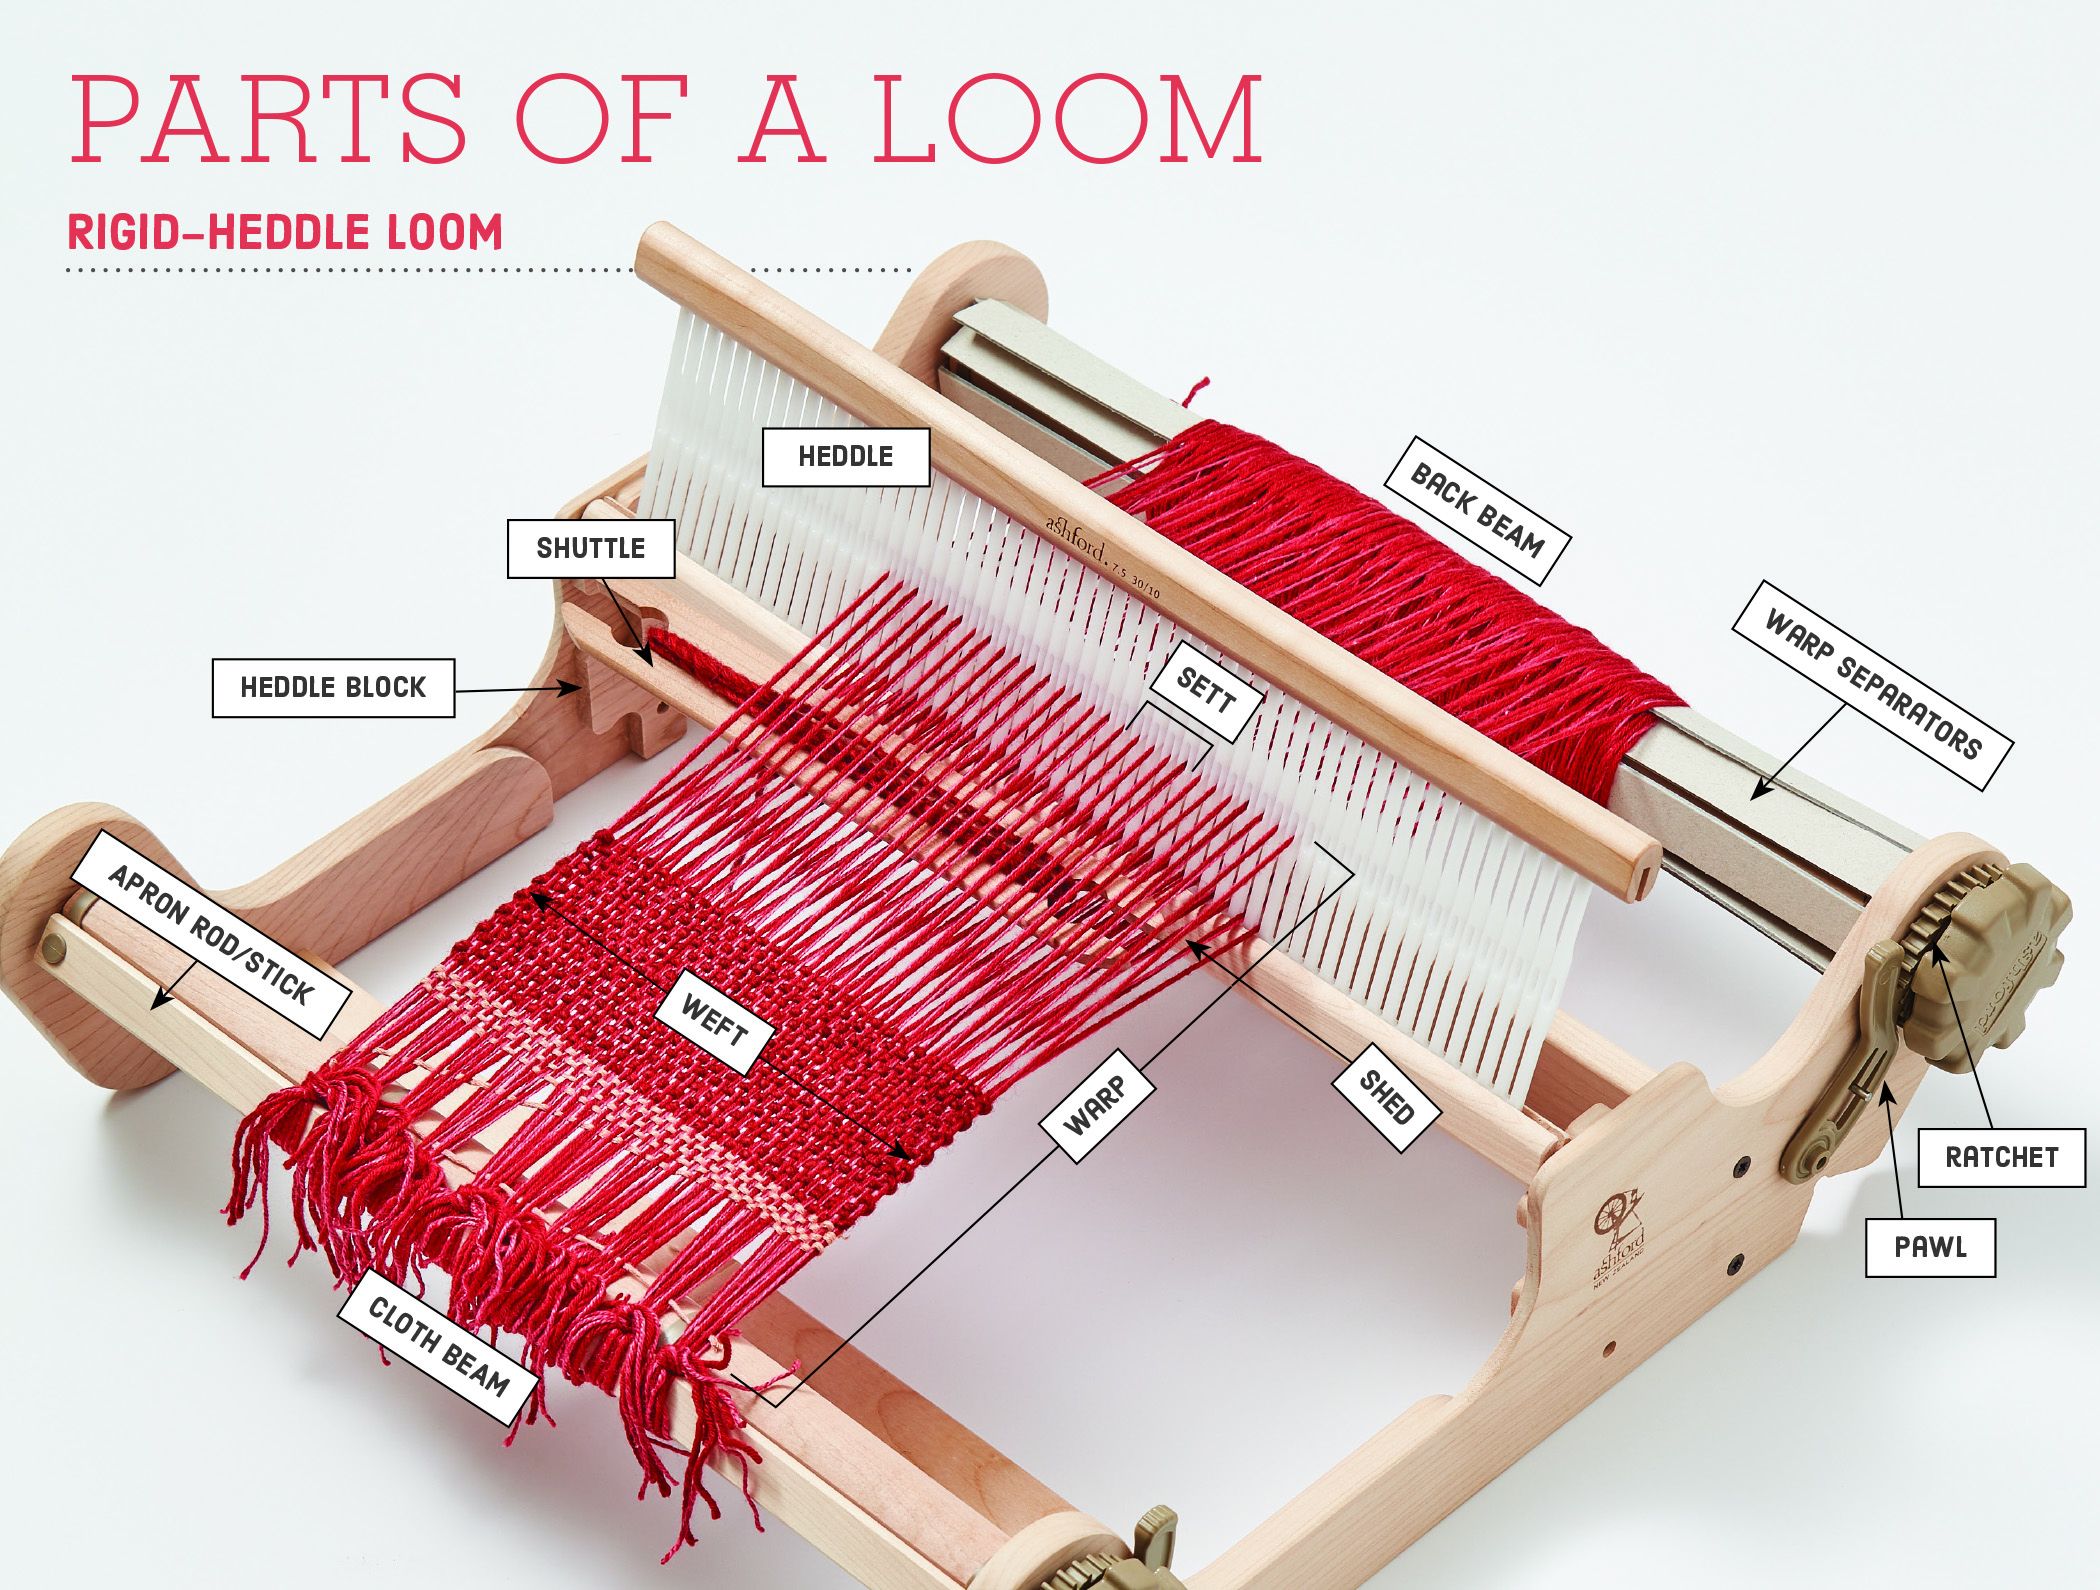 Photo by George Boe
Apron rods are often dowels but can also be flat sticks, depending on your loom. Rigid-heddle looms have two apron rods: one on the front, which is attached to the cloth beam, and one on the back, which is attached to the back beam. Each side of the warp is tied to an apron rod.
The back beam is a rod attached to the back of the loom that can turn forward or backward using a ratchet and pawl. The warp is wound onto the back beam before weaving.
The cloth beam is a rod attached to the front of the loom that can turn forward or backward using a ratchet and pawl. Woven cloth is wound onto the cloth beam as you weave.
Heddles control which warp ends are lifted or lowered. Slots and holes alternate along the width of the heddle, and each warp end is threaded through either a slot or a hole. The number of slots and holes per inch determines the warp density, or the warp sett, of the fabric. A heddle’s sett is referred to as its dent: A heddle with 8 slots and holes per inch would be an 8-dent heddle. Most looms come with one heddle, but you can buy heddles with different setts to fit your loom. The heddle sits in the heddle block where it can be moved into three positions: up, down, or neutral. Alternating moving the heddle up and down allows you to weave plain weave. After placing each row or pick of weft, the heddle is removed from the heddle block and used to beat the weft into place, and then placed back into the heddle block.
The heddle block holds the heddle in place. A heddle block is located on either side of the loom, one for each side of the heddle. Each heddle block allows you to move the heddle into three positions: up, down, and neutral. Some looms have heddle blocks for multiple heddles.
Along with the ratchet cog, the pawl is used to lock or unlock the back beam and cloth beam. When the pawl is in the ratchet, the beams can be turned in only one direction. When the pawl is off the ratchet cog, the beams can turn in either direction.
The ratchets on a loom turn the back beam and cloth beam. Along with a knob, the ratchet also has a cog. The ratchet is positioned next to a pawl. When the pawl is placed in the grooves of the ratchet cog, it locks the beam so it can be turned in only one direction. The ratchet and pawl are used to wind the warp onto the back beam, to tension the warp, and to advance the warp and wind fabric onto the cloth beam.
The sett refers to how many warp ends per inch (epi) or weft picks per inch (ppi) are in your weaving. The heddle controls the warp sett while yarn size and beat strength both play a part in the weft sett. A balanced sett refers to cloth with the same number of warp ends as weft picks per inch.
As the heddle moves up and down, every other warp end is either lifted or lowered, creating an opening between the layers of warp known as the shed. The shed is the tunnel through which you place your weft. Changing your shed changes which layer is on the top.
Shuttles hold and move the weft yarn through the shed during weaving.
The threads that are tied onto the loom and moved up and down are collectively known as the warp. The threads are referred to as warp ends. Warp ends can be made up of one strand or multiple strands working as one. Each warp end is threaded through either a slot or hole in the heddle.
Warp separators, sometimes referred to as warp protectors, are wound along with the warp onto the back beam to keep the layers from tangling. Some weavers prefer to use warping sticks as warp separators, as shown here, while others prefer to use bamboo placemats or blinds, corrugated cardboard, or thick paper.
The yarn that goes over and under each warp end is the weft. While the heddle and loom control the warp, the weaver controls the weft. One row of weft is known as a pick, although a pick can be made up of multiple strands of yarn used as one.
Once you’re comfortable with the parts of your loom, you’re ready to get warped and start weaving. Check out these video resources from world-class rigid-heddle weaving teachers to help you as you move on to your next steps.
Learn how to confidently warp your rigid-heddle loom in the free How to Direct Warp video featuring instructors Sara C. Bixler and Sara Goldenberg White. You’ll get step-by-step instructions on how to direct warp your loom as well as ingenious tips for getting perfect tension.
Start your rigid-heddle weaving journey on the right foot with the Sara C. Bixler’s video course Beginning Weaving on the Rigid-Heddle Loom. Sara covers choosing yarns, warping, weaving best practices, basic weaving designs, and much more.
Happy Weaving!
Christina
More from Little Looms
 Skill Guide: A Weaver’s Guide to FiberNo matter what loom(s) you love to weave on, understanding the different characteristics of a fiber can help you make better choices when picking yarns for projects.Christina Garton · July 31, 2026
 From WIF to Woven ClothLearn how to use WIFs and weaving software to create and edit patterns—before you put a single thread on the loom. Christina Garton · July 23, 2026
 Give Yourself the Gift of a Weaving GetawayWhat’s better than learning to master a new weaving? Doing it among friends, new and old! Little Looms Editors · July 21, 2026
 6 Easy Ways to Elevate Your Selvedges with TrimsAdd extra flair to your selvedges and hems with these terrific trims. Christina Garton · July 16, 2026
 Twill for the Rigid-Heddle Loom: It’s Easier Than You Think!Learn why weavers love twill—and what makes it a great weave for the rigid-heddle loom.Christina Garton · July 14, 2026
 A Celebration of Stripes: Call for Submissions Fall 2027We're looking for striped projects of all kinds for our Fall 2027 issue—and that includes plaids and checks, too!Christina Garton · July 9, 2026
 Make Your Own Cardboard Mini-ShuttlesButterflies are beautiful, but they’re not always the best choice when you’re weaving. Try winding small bits of weft on these simple, DIY cardboard shuttles instead!Christina Garton · July 7, 2026
 A Trio of Table ToppersGo beyond rectangular runners with table toppers. Christina Garton · June 30, 2026
 Crochet for Your Selvedges? Your Edges Will Thank YouFind out why Sara Bixler finishes some of her woven pieces with crochet. Watch her free video clip, and then dive into several stitch options to try on your next project. Little Looms Editors · June 25, 2026
 Compose a Masterpiece on Your LoomAfter all, a loom is just another type of stringed instrument. Christina Garton · June 23, 2026
From the Library


Comments
No comments yet — be the first to share your thoughts.
Sign in to join the conversation — commenting is for signed-in members.