
Loading the latest stories…





Take your weaving to go with these tips for travelling with your small looms and weaving supplies whether you’re going by plane or heading out on the road.
Christina Garton5 min read
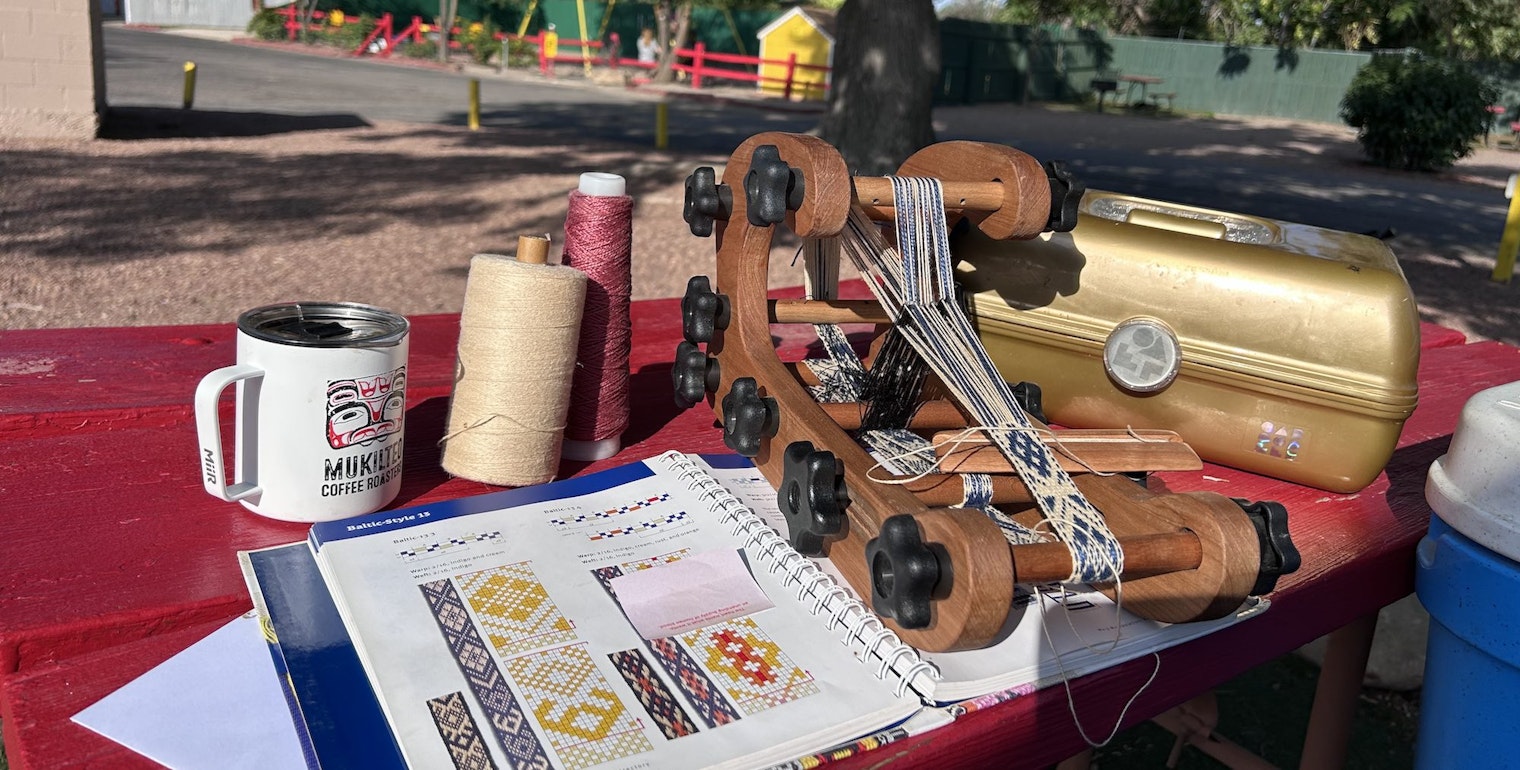
When I travel, I like to try to take some sort of fiber project to work on. As somebody who does not knit or crochet, I always take some sort of weaving with me, whether I’m flying or driving to my final destination. In fact, this past year I’ve gone on two major trips, one by plane and one by car, and taken my weaving with me on both trips.
I know travelling with weaving tools can be stressful (especially if you have to go through airport security!), so I thought it would be fun to share a bit of how I approach travelling with small looms. I’ve learned a lot about which looms travel best, which tools to take (and which to leave home), how to pack my supplies, and what to expect when I go to the airport.
 Pin looms might very well be the ultimate option in travel-friendly looms.
Pin looms really are ideal travel looms because the loom and weaving supplies take up a very small amount of space. I usually toss mine in a small zip bag that’s just big enough for a loom, weaving needles, snips, and some small put-ups of yarn. This same setup works perfectly for small tapestry looms, too. I have an I-style tapestry loom that is about the same size as my pin loom and requires just a couple small tools for easy weaving on the go.
For bandweaving, I usually take an inkle loom, and I specifically bought one that would work well for travel. Not only is it small enough to fit in a carry-on bag, but it also comes apart so I can store it flat in a zip bag. It’s double-sided, so if I don’t dismantle it for travel, I don’t have to worry about bands slipping off during transit.
While I haven’t traveled with my rigid-heddle loom (yet), there are plenty of good travel options. The small 8-inch rigid heddles fit well in carry-on bags, and you can also get ones that fold relatively flat—even mid-project!
 Christina’s travel-sized inkle loom comes apart so she can store it flat when she travels.
If I’m flying, I like to keep my weaving tools in cloth zip bags. This keeps everything I need together and makes it easy to find in my luggage. If I’m taking classes (as I did at Weave Together) I can just grab my zip bag and go. I'll also pack a tote bag big enough to carry my loom and supply bag around if I’m planning to take my weaving to the beach, the park, or pretty much anywhere else. If you’re taking your rigid-heddle loom, many loom companies even make bags specfically designed for their rigid heddles and all necessary tools, which makes things even easier. Tote bags pack flat, and if you end up in a town with a grocery-bag ban, they can come in handy when you go shopping.
 Old tackle boxes like this one work great for keeping weaving supplies well organized while on the road.
When I drive to a destination, however, I have a much different setup, at least when it comes to my inkle-weaving supplies. I use either a tackle box or an old-school Caboodle organizer. I like the tackle box if I want to pack a variety of pearl cotton balls (what I usually use for tablet weaving) because the upper organizer tray is just the right size for keeping them from rolling around. The Caboodle is great if I plan to work from a charted pattern because I can easily clip the pattern on the pop-up mirror. Even better? I got both of these boxes from my local thrift store for less than $5 each. While I use these primarily for bandweaving, they’d be perfect for tapestry and pin-loom weaving supplies.
 The pop-up mirror on Christina’s Caboodle storage case doubles as a chart holder with the aid of a simple clothes pin.
Speaking of tools, if you’re taking your unwarped rigid-heddle loom, consider leaving the warping peg at home and taking table clamps instead. I learned this tip from Elisabeth Hill who often weaves on the road. She found the clamps could easily fit on thick tables (like those found at rest stops) allowing her to have an easier time warping on the go.
Going through airport security is always nerve wracking, but it’s even more so if you have needles and yarn snips in your bag. Definitely do your research. Depending on where you’re travelling in the world, the limitations on what you can and cannot take might be very different. According to TSA, scissors must be less than 4" from the pivot point and should be sheathed in some way. While I have plenty of really nice scissors that fit that description, I prefer to take a cheap yarn snipper. It’s small, has a plastic lid, and if it does end up getting confiscated, I won’t cry over its loss. I’ve also seen it recommended that you take plastic children’s scissors because these look non-threatening and so are less likely to be flagged. Another friend who is a tatter told me she brings nail clippers instead of scissors when she travels. They're sharp enough to cut the threads and don't bother security. While I wouldn't suggest nail clippers for thick wools, I bet they'd work great the finer cottons used for bandweaving.
Of course, no matter how well you follow the rules, there's always a chance you'll end up with your scissors or any other sharp objects confiscated, so just be prepared to buy new items at your destination and don’t take anything too expensive. This is not the time or place for your heirloom-quality emrboidery scissors! Personally, I've had my fiber tools taken out for extra security scanning on only two different occasions—and neither time was it because of a pointy object. The first time it was a drop spindle, and the second time it was my stored-flat inkle loom. Be aware that anything that might look odd on a security scanner to somebody who isn’t familiar with weaving might raise an alarm, so it can be helpful to keep these items at the top of your bags.
Of course, these are just the basics of tips for travel, but if you want to know more or have specific questions, let me know at handwoven@longthreadmedia.com.
Happy Weaving!
Christina
More from Little Looms
 Skill Guide: A Weaver’s Guide to FiberNo matter what loom(s) you love to weave on, understanding the different characteristics of a fiber can help you make better choices when picking yarns for projects.Christina Garton · July 31, 2026
 From WIF to Woven ClothLearn how to use WIFs and weaving software to create and edit patterns—before you put a single thread on the loom. Christina Garton · July 23, 2026
 Give Yourself the Gift of a Weaving GetawayWhat’s better than learning to master a new weaving? Doing it among friends, new and old! Little Looms Editors · July 21, 2026
 6 Easy Ways to Elevate Your Selvedges with TrimsAdd extra flair to your selvedges and hems with these terrific trims. Christina Garton · July 16, 2026
 Twill for the Rigid-Heddle Loom: It’s Easier Than You Think!Learn why weavers love twill—and what makes it a great weave for the rigid-heddle loom.Christina Garton · July 14, 2026
 A Celebration of Stripes: Call for Submissions Fall 2027We're looking for striped projects of all kinds for our Fall 2027 issue—and that includes plaids and checks, too!Christina Garton · July 9, 2026
 Make Your Own Cardboard Mini-ShuttlesButterflies are beautiful, but they’re not always the best choice when you’re weaving. Try winding small bits of weft on these simple, DIY cardboard shuttles instead!Christina Garton · July 7, 2026
 A Trio of Table ToppersGo beyond rectangular runners with table toppers. Christina Garton · June 30, 2026
 Crochet for Your Selvedges? Your Edges Will Thank YouFind out why Sara Bixler finishes some of her woven pieces with crochet. Watch her free video clip, and then dive into several stitch options to try on your next project. Little Looms Editors · June 25, 2026
 Compose a Masterpiece on Your LoomAfter all, a loom is just another type of stringed instrument. Christina Garton · June 23, 2026
From the Library


Comments
No comments yet — be the first to share your thoughts.
Sign in to join the conversation — commenting is for signed-in members.